
Mass digitisation and born digital sources have changed the work of historians, archivists and museologists. Many historians spend less time in the archives, instead photographing or scanning sources on short research visits. In other cases archivists and museologists create online repositories to make sources more accessible. But what happens to all the photographs researchers make?
My research looks into the history of the design and use of computers, with a focus on material history and starting from museum objects. Since my primary sources are located across Europe and the United States, the time I can spend in museums and archives is limited. Therefore, I cannot combine source collection and analysis during research visits, and instead briefly look at the objects on display or sources in the archive catalogue to decide whether or not to digitise. After a day in the museum or archive, I usually generated between 200 and 700 images. So far, seven museum visits and four archive visits have resulted in a total of over 10.000 images. In order to remember when, where and what I digitised, the structure and organisation of my notes, photographs, and/or scans is essential. The metadata needs to be rigid enough to relocate a source, yet flexible enough to reorganise and recombine sources to facilitate the analysis. This Digital History Reflection describes lessons I learned before, during, and after my research visits in the United Kingdom, the United States, and Germany.
1. Selecting Sources
On short archive and museum visits preparation is key. Review the policy in detail before your visit: are you allowed to scan or photograph? What has already been digitised? How is the collection organised? Avoid repeating what has already been done and make sure to select what is relevant to your research. In an ideal world a museum or archive has an online catalogue, especially one that includes browsing, filtering, and search functionality. Finding aids are especially helpful to get an idea of the material an archive offers. In large collections, even specific searches sometimes generate too many results and filtering can help refine relevant sources. Furthermore, reviewing the temporary and permanent exhibitions allowed me to immediately find the most relevant locations in a museum.
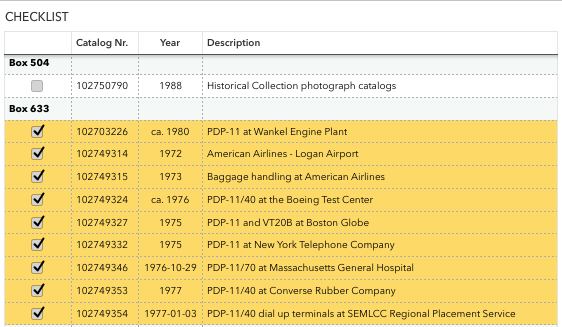
For my visit to the Computer History Museum archives I started from collection finding aids, and created a spreadsheet listing the collection, box, catalog number, date, and short title of each item. Once I emailed my list to the archivist however, I realised I was only allowed (and able) to consult a maximum of ten boxes per day. Choosing only those boxes with either very important, or many items per box, I managed to reduce the list dramatically and was able to focus on a limited number sources. Furthermore, adding simple tick boxes to the spreadsheet meant I could keep track of those items I eventually photographed, taking only very short notes for each item. Colour coding items narrowed down which boxes I went through on one day.
2. Museum and Archive Workflow
For archive visits, my luggage usually contained: a camera, SD-card reader, and external hard drive to transfer and make a back-up of the photographs, the Remarkable tablet to take notes, my laptop to go over the list of items and quickly look up additional information, and chargers for each just in case. In museums I carried my camera, tablet to take notes on guided tours, and smartphone to record functioning computers. In general I would first take a quick look at the entire museum before focussing on certain parts or computer models.
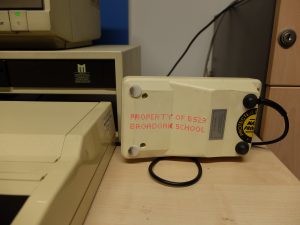
After the first day of my visit to the Centre for Computing History in Cambridge (United Kingdom) I found a good workflow for documenting a single machine. First, an overview photograph gave an insight into the setup of a computer, then I zoomed in on each component or peripheral such as the screen, keyboard, or mouse, followed by a photograph of the object description. What I forgot to photograph however was the bottom of the mouse (did it have a ball, laser, or other mechanism to register movement?), which I added the day after. In some cases, exceptional inscriptions or signs of wear were also interesting, such as the names of schools printed on some of the BBC Micro computers.1 A few museum visits later I also realised a photograph taken from the side would help grasp the dimensions of the object.
Photographs of archival sources should include the folder or item number where possible, at least for the first and/or last photograph of the same source to distinguish them later on. Furthermore, respecting the order of a source by photographing one page, folder, or object after the other saves time in comparing notes to photographs later on. After each day, I copied all images including metadata into the correct folder (in my case one folder for each museum or archive) and immediately created a backup on an external hard drive. At first I made the mistake of renaming files to the computer model, but quickly realised it messed up the order of the photographs. Adding tags in folders was also disorganised without a clear ontology or structure in place to ensure consistency, and document tags were difficult to export later on.
3. Annotating Images
Choosing a tool or method always depends on what works for the project. For some researchers, combining images into a single PDF (i.e. PDF Sam) and adding each to a bibliography management tool such as Zotero, Mendeley, or EndNote is the easiest and most efficient solution. Others choose to build their own dataset with a database manager such as Ninox, or turn to other digital asset management software.2 Determine the requirements first, keeping in mind the budget, knowledge required (programming?), and time investment. Since annotating images is just one step in the research project, does this tool fit into the ecosystem of the research? Be mindful of the workflow, compatibility with other tools, or integration into a website for instance.
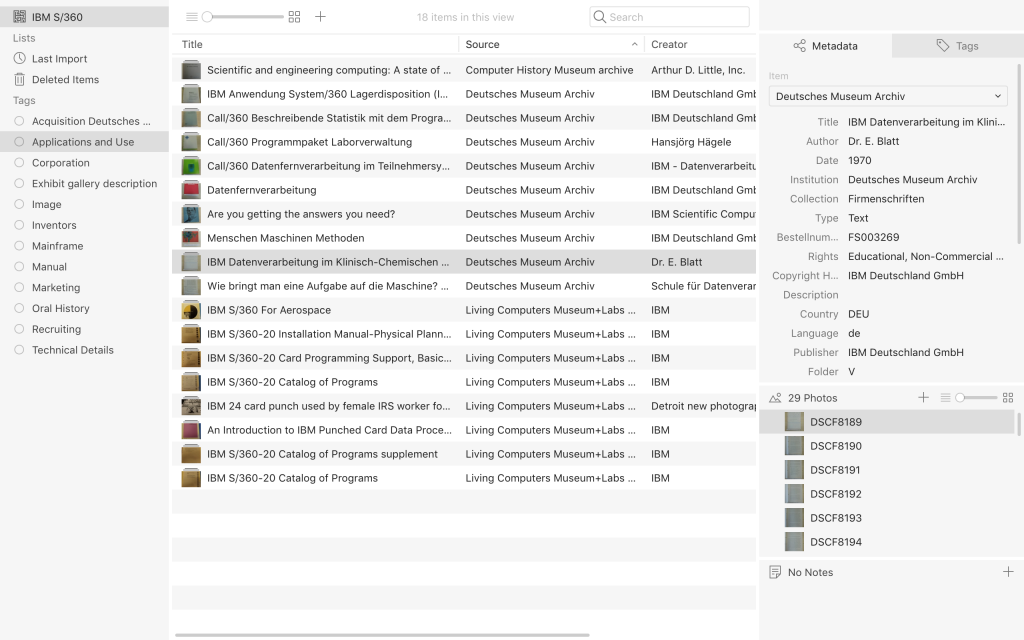
In the end, Tropy suited the project best, mostly because the photographs remain in their original folders, and only a small tile of the image is uploaded. Tropy was developed by the Roy Rosenzweig Center for History and New Media, who also developed Zotero. The downside is that the file path should remain the same in order to view a photograph in the item view. I usually browse all photographs first, write down the file names of my selection, and then upload all photographs to the specific collection. In the next stage I group photographs into items and in bulk immediately add the correct source (i.e. museum or archive), as well as the rights (i.e. Educational, Non-Commercial Use only) determined by the institution’s policy. For each source or institution I created a separate metadata template based on the information available in the catalogue of the institution and additional research needs. Once I inserted all metadata for an item I added some tags such as image, mainframe, or manual to filter items later on. Notes were very useful for transcribing any text on the image (except for full pages, unless very valuable), but can also be used to formulate ideas or thoughts, and will show up in search results.
4. Analysis and Research Communication
Besides transcribing sources, Tropy makes comparisons between sources from different institutions easier since tags help to discover links between sources. For the first chapter of my dissertation, the tags in combination with secondary literature are at the basis of the narrative structure. Nevertheless, tags also further decontextualise sources from the original order in the archive and the collection the original source belonged to. Tagging is always a trade-off between few but broad terms, and many but narrow terms; consistency and maintaining the overview are key. Unfortunately, Tropy doesn’t facilitate comparing two images from the same or two different items in a single window, or opening each in a new window. Selecting a specific part of a photograph is possible, and can be turned into a new item with additional metadata. This capturing feature can be useful for separating images from text (where this is desirable).
Although the metadata adheres to existing Linked Open Data ontologies, sharing photographs is complicated by copyright laws and institutional policies. The metadata can only be exported to JSON-LD or Omeka S, a web publication system from the same developers. Furthermore, a bibliographic export feature with customisable formatting templates would greatly improve referencing sources included in the collection. The developers explicitly state that “Tropy is not a citation manager”, so such a feature is unlikely to appear.3
Historians increasingly rely on digitised and born digital sources, yet Tropy is one of the first research photo management tools specifically designed for historians. In times of multimedia however, researchers are looking for all-encompassing digital asset management software to annotate, structure, and recombine not only text, or photographs, but include audio, video, and even 3D-renditions of objects. For now, files are stored locally which prevents both synchronisation between different machines and collaboration with others. Fortunately, the range of media Tropy can import, as well as remote access and cloud storage are underway4 For now, the strength of Tropy is the improved navigation of large photo collections with a powerful search, tag and annotation. Although organising sources, adding metadata, tagging and transcribing is time consuming, data asset management tools definitely save time in the final and crucial writing phase.
- Similar marks can be found at The National Museum of Computing in Bletchley Park where they also reconstructed a BBC Micro classroom for educational workshops.
- A list of free digital asset management software with reviews can be found here: https://www.predictiveanalyticstoday.com/best-digital-asset-management-software/, for open source applications see: http://www.open-source-guide.com/en/Solutions/Applications/Dam.
- https://docs.tropy.org/before-you-begin/readme#tropy
- https://tropy.org/blog/next-steps/